How to Travel with Goldfish
This is a step-by-step guide of how to travel with your goldfish by car over many miles, hours, or days and have them remain healthy and happy during the relocation.
by Tesh617
There are some limitations to this method of travel for your fish:
1) They should be in the same compartment of the vehicle as yourself, not a moving truck or trailer.
2) The compartment must temperature controlled (I.E. Air conditioning in the summer or Heat in the winter.
3) They will need a clear space where no other items are tapping against their container and no items will fall onto the container during transit.
4) Also, the size of your tank and number of fish you have will effect how many buckets you will need (see below)
Moving goldfish
I do the following using a 4-door sedan, in which I am still able to fit all of the items from my dorm room in addition to the fish, so do not think that you will need a massive vehicle =)
I happen to have a 37 gallon tank with 3 6-inch fancy goldfish, however, I used the exact same method (same bucket set up and all) when I just had one small goldfish in a 10-gallon tank.
I am unsure of how many fish I would be comfortable using the exact same set-up, but I would probably draw the line at 4, and use more buckets for other fish.
—————————————————————————————————————————–
*Try to keep water conditions ideal for the weeks prior to travel as to reduce fish stress. Do a typical 15% water change the day before travel as well, and do not feed them the day before or during travel- this helps cut down on waste and water pollution*
You will need the following supplies as depicted:
-Two 5-gallon utility buckets, and one utility bucket lid. These are $5 at Home Depo (and much sturdier than the petco ones, which are $8)
-Glad Press-and-Seal Wrap (NOT Saran wrap like in the picture. I just had no press and seal in the house.)
-Battery-operated Air Pump, 1-2 ft of air tubing, small air stone (usually a package deal, about $25 at Petsmart)
-Multiple sets of spare batteries for the air pump (mine have never ran out during the trip, but just incase!)
Step 1: Designate one of your buckets the ‘Fish Bucket” and fill it using ‘top water” like in the image below. This top water has a higher dissolved oxygen concentration (D.O. is what fish breathe, contrary to the common belief that they breathe ‘water’ )
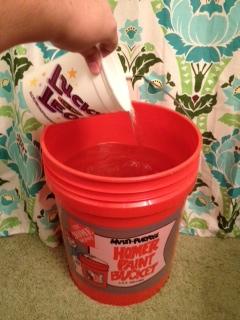
You will want your bucket to have about 4 gallons of top water. (the 5-gallon line is right under the bottom most rim of the bucket, so aim for an inch or two below that)
Step 2: Wrangle your fish! They can be tricky little buggers, and the whole process tends to stress mine out, so I like to catch them in the net, but pass them into a large cup (of tank water) rather than letting them flop around in the net once I bring them out of the water. See below.
travel with goldfish
Calmly slipping the net around my littlest fish, Gibel:
(I let Gibel go after that, but pretend he is now swimming from the net into the cup)
Then submerge your cup slowly into your “Fish Bucket” filled with top water and let your fish swim out at his leisure, rather than dumping him in. (Again, pretending Gibel is swimming out of the cup)
travel with goldfish
Repeat this process with the rest of your goldfish, keeping them in the SAME fish bucket! (unless you have more than 4 fish, in which case I would keep it to 4 fish PER bucket if they are 6+ inches in body length)
Step 3: Now that all your fish are in the Fish Bucket, you need to cover 2/3 of the top with Glad Press and Seal wrap. Make sure to dry the outside and lip of the bucket first, then press firmly on the wrap on lip of the bucket to make sure it is REALLY sealed. I also like to firmly press it onto the side of the bucket, just to be safe
Move goldfish aquarium
Step 4: Place the air stone (attached to tubing, attached to air pump) in the bucket, allowing the stone to touch the bottom of the bucket (just don’t hit your fishes on the way down!)
travel with goldfish
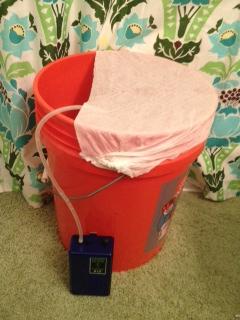
Step 5: Turn the tubing so that your pump is on the far side of the bucket, farthest from the open edge.
(Make sure that your air stone is still a few inches below the water level in such a case, or else you may need longer tubing.) With the tubing out of the way, you can now cover the other side of the bucket. Once again, cover 2/3 of the bucket, starting on the uncovered side. This leaves the middle 1/3 of the bucket DOUBLE covered, and this is what you want. Once again, press firmly all over the lip/edge of the bucket so both sheets of wrap are completely sealed. Do NOT, however, seal the 1/3 overlap in the mouth of the bucket. These will lay closely but be unsealed, allowing the air that is being pumped in to then escape the bucket. This over lap prevents splashing and evaporation while also allowing air circulation for the bucket.
Covered bucket with air pump:
travel with goldfish
Now your fish are ready for transport! I usually let them chill in the bucket with the air pump on while I fill the second bucket, just to let them get used to it without the bumpiness of the car ride.
Step 6: For your second bucket, which is your ‘water bucket’ fill it again with top water. And then you have two options:
1) Seal the bucket with the lid
2) Place the tank filter in this ‘water bucket’ so that it can stay wet during transit, increasing the chances of keeping the healthy bacteria alive and preventing a jump in the nitrogen cycle when you re-establish your tank. This can be complicated if you have a ‘hanging filter’ and so you may want to just put the filter media in the water, and transport the rest of the filter in a box with the rest of your fish supplies. If you have a pond pump or submerged filter, however, then you can just put the entire pump in the bucket and use the same ‘press and seal’ technique.
The second bucket, sealed with the lid:
Step 7: Put those suckers in the car! I make sure that I have everything else packed in the car and that the fish are the very last thing to go.
What I do is let the air conditioning run in the car for a few minutes so the cabin is the same temperature as the room the tank was in previously.
I also make sure that there is a space cleared for the fish in the car where nothing is touching the bucket or in danger of falling on the bucket. I place the Fish Bucket behind the passenger seat, and back the passenger seat up just enough to secure the bucket against the back seat so it can’t wiggle loose (just incase of a fender bender).
I then place the air pump on the seat next to it, rather than on top of the bucket, because the air pump vibrates, and is rather noisy, so putting it in the back seat keeps it from disturbing the fish and myself.
The Water Bucket, on the other hand, can go anywhere that is convenient and doesn’t need to be temperature controlled. I often put it in my trunk, or buckle it into the back seat behind the Fish Bucket (so that it can’t fall forward onto it.)
As far as your tank goes: I just drain the rest of the water from my tank, leaving just the little bit that is nearly impossible to get out to keep the rocks moist. My tank is glass, and as such must sit on an even surface during transit or else it can easily shatter (do NOT try to sit glass tanks on car seats! Harness your tank to a completely stiff board larger than the tank’s base as a level surface for the tank if you cannot use your trunk!). Because of this, I put it laying on the back side in my trunk with the top of the tank being on the side, and so I place some towels below the opening in case the water left in the rocks spills out.
Step 8: Transit! I can only assume you will make food and potty breaks. During my normal 11 hour trip, I stop just once half way through and knock out food gas and relief all in one stop. Since it is such a long time, I like to check on my fish to see what they are up to. To do this I just open the passenger side door and peel back the top layer of press and seal, and wait for each one of them to swim into view. I then press it back on and go on my merry way!
If you are traveling for multiple days or keeping them in the travel bucket for multiple days, try to check on them every few hours. If you have the opportunity to stop for the night at a hotel or if you are at your destination and just cannot set up the tank yet, take the fish inside with you. They need to have controlled temperatures and cannot be left in the car overnight or during the day while you move your stuff in.
Once in your hotel room or new home, put them in a quiet place where you wont be passing by much (reduces vibration stress) and peel off the ‘press and seal layers’. With the layers off and the pump on there is some great air circulation which keeps